Tutorial on EPIC's New Instrument Request Form and PI Home Page - Page 2
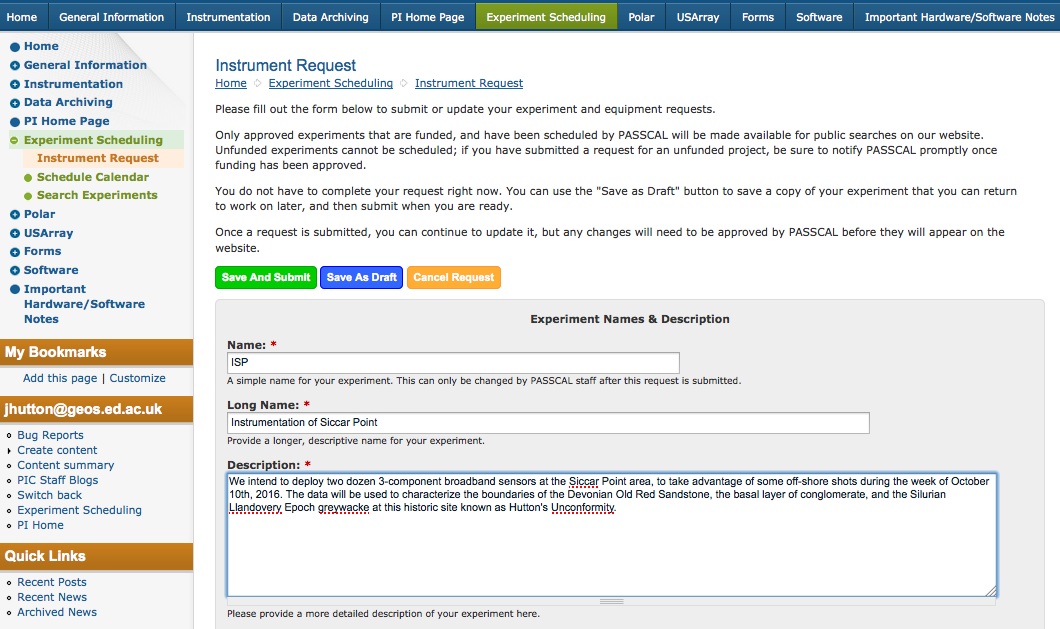
On clicking the "Make a New Instrument Request" button, you will go to the page to add a new Request. You don't have to submit the request until it is ready; you may save your request as a Draft, and come back to it later. Once the request is ready to be submitted to EPIC, you can click the "Save and Submit" button to send it to EPIC for consideration. If there are errors (e.g. end date comes before start date, a required field was omitted, etc.) these will be red-flagged so that you can correct them; once these corrections are made, you will be able to save a draft, or complete the submission process.
The first part of the Request form asks for the project's name, its long name, and a brief description. These will be visible to the public once the project is scheduled by EPIC.
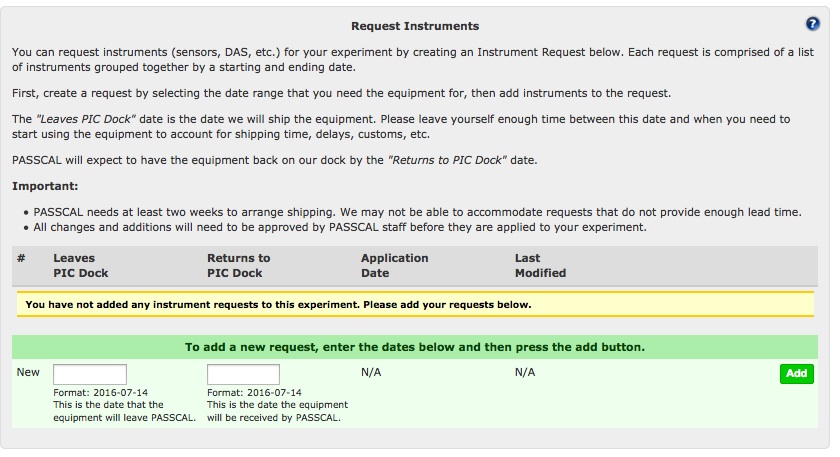
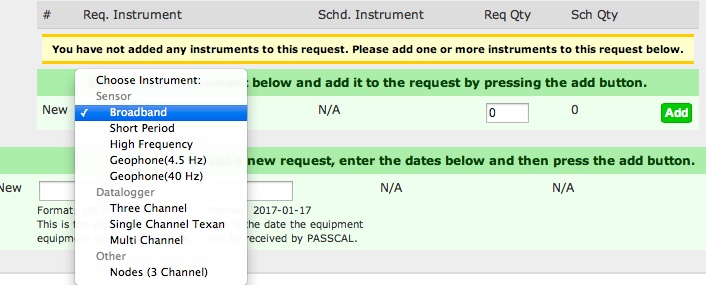
The next part of the request form covers the Instruments which you are requesting. An experiment may have one or more Requests (i.e. multiple phases on different dates), and each Request (or phase) may include one or more instruments. Each Request has a start date and an end date; instruments will be added later. For each Request, enter the start and end dates and click the green "Add" button to get started, as shown.
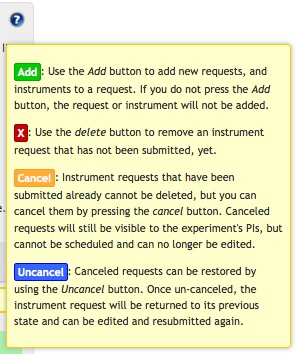
Clicking the Question Mark at the upper right of the Request section pops up a useful Help notice, with details on how the request buttons work.
Before clicking the Add button for a new Request, enter both the start and stop dates using the pop-up calendar. You may type in the date (use the format YYYY-MM-DD), or you may select the date from the pop-up calendar. If you use the pop-up, after setting year and month, be sure to go ahead and click the day of the month (1-31) to finish the selection properly.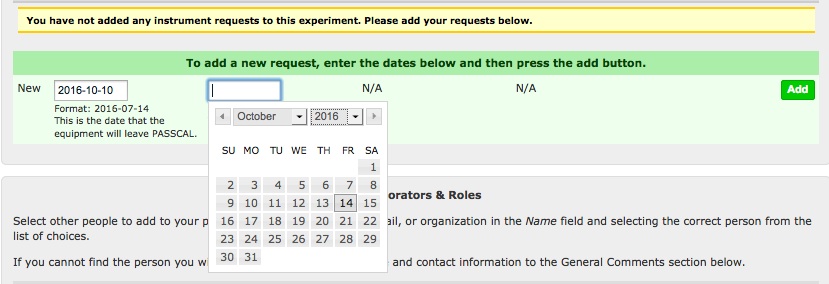
Once both dates are entered, click the Add button to add the request.
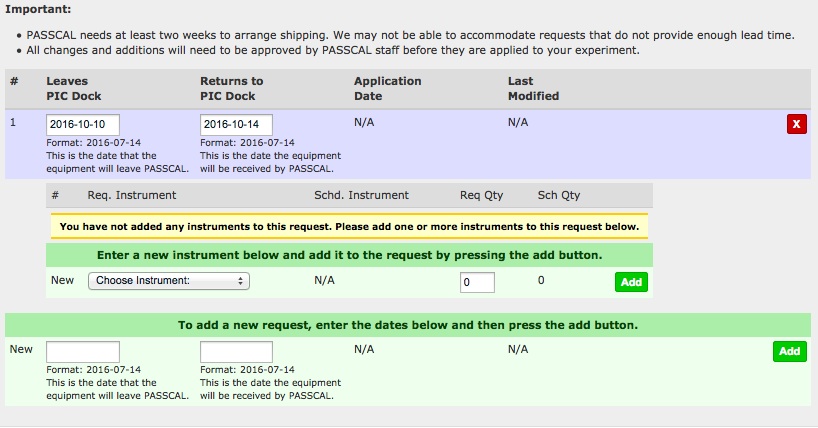
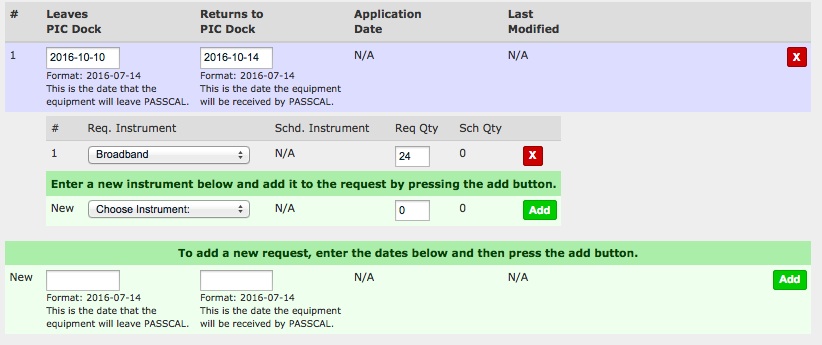
Once the request has been added, it will appear with a violet background, along with a new "X" button which allows you to delete the request. Beneath the newly-created request, you will now see a new row for Instruments. You may add multiple instruments to each Request, and you may ask for additional Requests (with different start and stop dates).
To add Instruments, click the Add button after selecting the instrument type. You may add a Datalogger (DAS) or a sensor. Many requests typically include matched numbers of Sensors and Dataloggers, which appear as two separate Instruments for the request.
After selecting the instrument type, type in the desired Quantity into the "Req Qty" field.
Upon clicking the Add button for this instrument, you will see the instrument with a gray background, and with an X button to delete the instrument row if needed. Another "Enter a new Instrument" row is also provided.
Continue in this manner until you have completed the requests and instruments. Here, the PI is asking for 24 broadband sensors and three-channel Dataloggers for the period 2016-10-10 through 2016-10-14, and for 12 Short Period sensors for the period 2017-10-16 through 2017-10-20.
The next portion of the Request form allows you to add other PIs to the project. You do not have to add yourself; by making the request, you are automatically made the main PI for this project. To add collaborators, just type their name in the Name field, and select the PI using the auto-complete feature. If you cannot find the person you wish to add, please add their name and contact information to the General Comments section below.
Once the auto-complete for the collaborator has been selected, the PI's email and organization will appear as shown. Then, click the Add button to add this collaborator.
After the collaborator has been added, the form will appear as shown. You may delete the PI, or change the collaborator by typing a different name into the Name field.
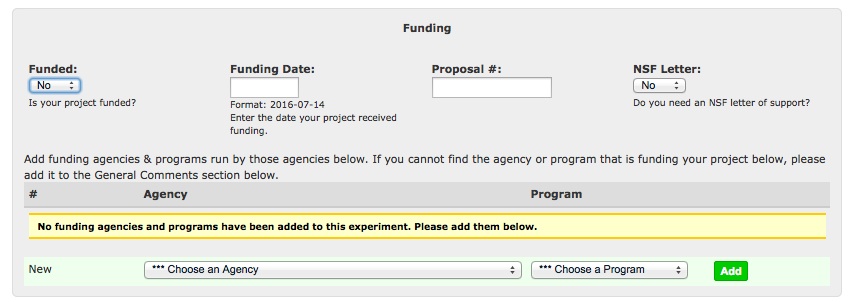
The next section covers Funding and Sponsors. If your project has been funded, be sure to select "Yes" from the funded dropdown; EPIC cannot schedule your project unless the experiment is Funded. If you are still waiting for funding approval, select "No" from the funded dropdown; if your funding is approved later, you can update the request at that time.
Fill in the Funding Date and Proposal fields if possible. If you need an NSF Support Letter, be sure to select "Yes" from the NSF Letter dropdown. This will start the process in which EarthScope/EPIC develops the Support Letter for your project. We ask that PIs request letters at least two weeks before they plan to submit their proposal, to allow adequate time for EarthScope/EPIC to prepare letters.
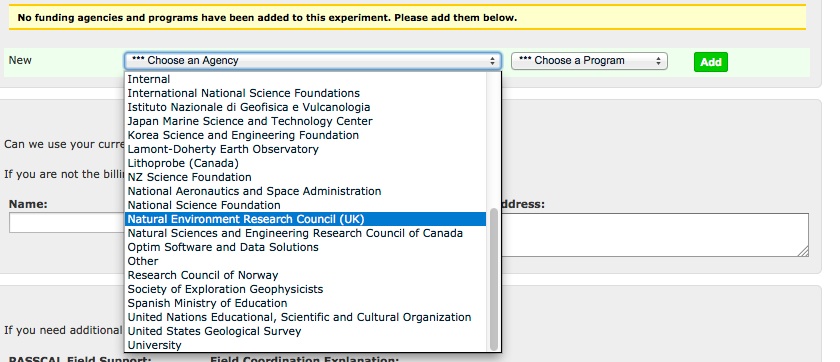
Before moving past the Funding/Sponsor section, be sure to identify your sponsors by agency and program. First, select an Agency from the dropdown as shown.
Once the Agency has been selected, the dropdown showing corresponding Programs will be updated dynamically. Select the appropriate program from the Programs dropdown, then click the Add button to add this sponsor. You may add multiple agencies/programs if there are several sponsors. If you cannot find the agency or program that is funding your project in the dropdowns, please mention it in the General Comments section at the bottom of the Request form.
A completed Sponsor section will appear as shown.
While EarthScope/EPIC does not charge PIs for the use of instruments, PIs must pay for shipping and support costs. If the bills for these expenses should be sent to you, the main (submitting) PI, select "Yes" from the dropdown labeled "Can we use your current contact information as the billing address?" Otherwise, select "No" for this dropdown, and enter the billee's name, phone, email and address, as shown.
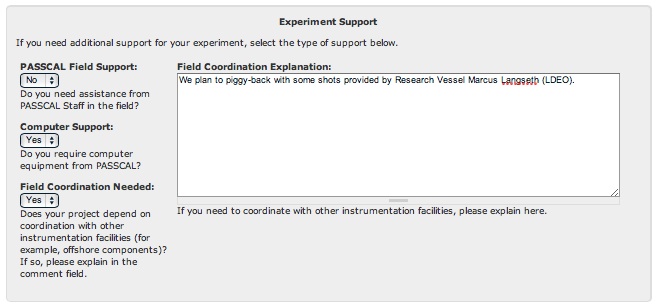
The next section concerns Experiment Support. If you need EPIC personnel to support your field effort, select "Yes" from the "EPIC Field Support" dropdown. Similarly, if you need EPIC laptops in the field, select "Yes" from the "Computer Support" dropdown. If you are coordinating with other projects or experiments, e.g. piggybacking on active sources or etc., select "Yes" from the "Field Coordination" dropdown, and then describe this coordination in the "Field Coordination Explanation" field, as shown.
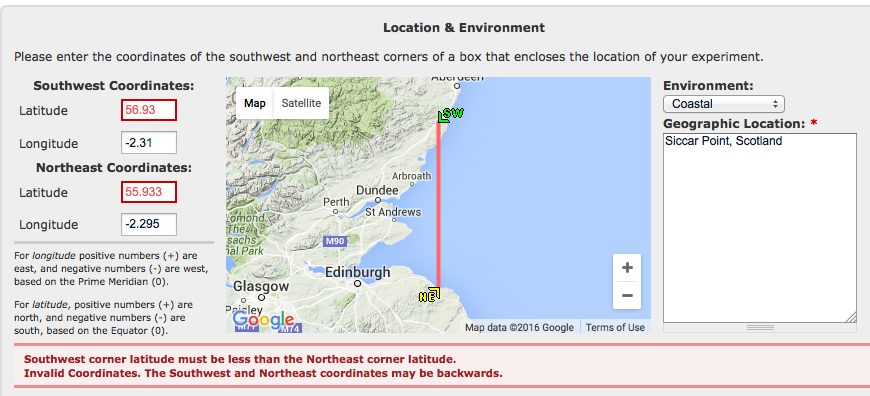
The Location and Environment section allows you to indicate the location of the project with Google Maps. In addition to a dropdown for the type of Environment, and a brief verbal description of the Location, you will be asked to enter latitudes and longitudes for the southwest and northeast corners of your project area.
The southwest corner's latitude should be strictly less than the northeast's corner's latitude. For example, in the northern hemisphere, 40o < 50o, while in the southern hemisphere, -50o < -40o. Here, the PI has incorrectly put the Southwest corner latitude as greater than the Northeast corner latitude, triggering an error message on the form.
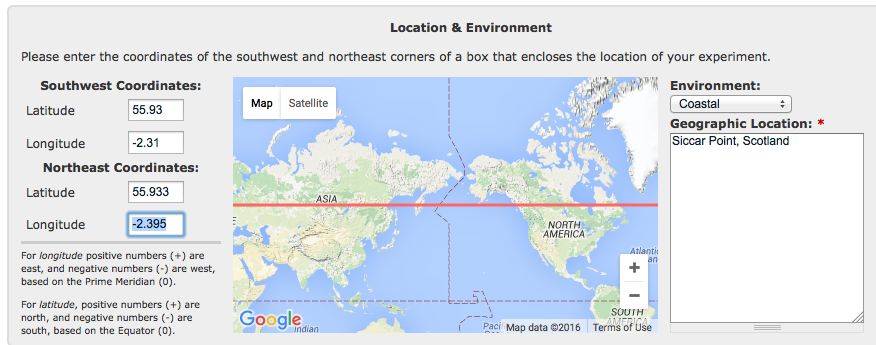
Longitudes are handled a little differently. For small areas, the Northeast corner's longitude is strictly more than the Southwest corner's longitude. Here, the PI has entered a Northeast longitude that is less than the Southwest corner's longitude, which Google Maps interprets as girdling the entire globe, as shown. Always check the map display to make sure your project area coordinates have been entered correctly.
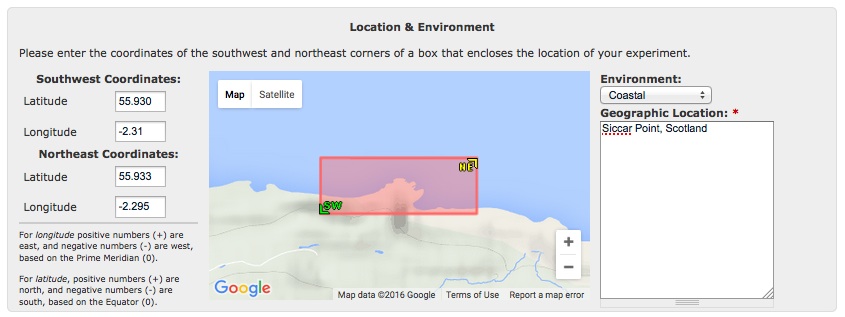
When the coordinates of a small region have been entered correctly, the map display will zoom in on that location, as shown below for the Siccar Point area of Scotland. This map display will be available to the public after the experiment is scheduled.
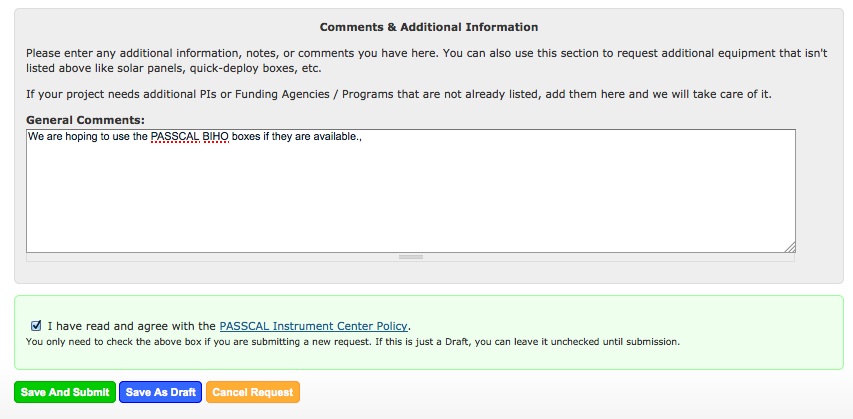
The last section of the Request form is reserved for comments and additional information. If you were not able to choose a PI collaborator or funding agency/program in earlier sections, you may describe them here. Also include any other comments regarding project support, and any ancillary equipment like cables, etc.
After reading and checking the box for EPIC Policy, you can submit the form to EPIC ("Save and Submit"), or you may save it as a draft. Draft versions are not submitted to EPIC, and can be viewed on the PI Home Page, and re-edited as needed. You may also cancel the entire request, but you won't be able to come back to it later.
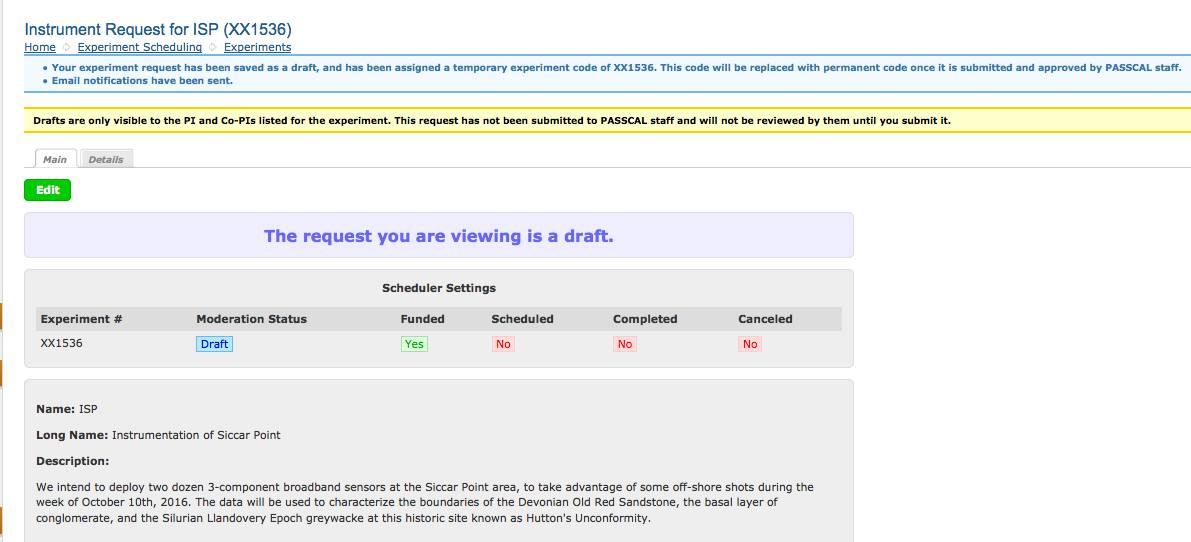
If you save the request as a Draft, its status will be indicated on the new page for the Project. Initially, projects are assigned numbers like XX1538. Later, this number will change once EPIC has approved and/or scheduled your request. The "Edit" button at the top and bottom of the experiment display page allows you to edit the request again, whereupon it can be saved as a draft again, or formally submitted to EPIC.
Next: the PI Home Page
- Home
- General Information
- Instrumentation
- Dataloggers
- Sensors
- All-In-One Systems
- Power Systems
- Field Procedures
- Controlled Sources
- Seismic Source Facility
- Magnetotelluric Systems at EPIC
- Ground Penetrating Radar
- GNSS/GPS Receivers
- Power and Memory Calculations Form
- Data Archiving
- Apply for a PI Account
- Experiment Scheduling
- Polar
- Hardware & Software Notes
- Software

